Sunday, June 30, 2013

How to Make Free Calls to All Network on Your Mobile Phone with MTN Line (Magic Calls)

Yeah, Shelaf is here again with another interesting, ever wanted article, I believed few of us were remembering the last term I wrote a post on How to Make Free Calls to All Network on Your Mobile Phone with Airtel Line which rocked for almost three weeks before Airel blocked it. This is also similar to that but this one is more superb than the previous one of Airtel. It is not only working with MTN to MTN but MTN to all networks for free. With simple code, which am going to give you now, you can make calls to all Network without paying a dime. Could you believe that I have been  making calls to all  networks including UK and India free of charge. You can call it magic Sim but I will call it magic call.
It is just a simple tutorial that everyone should benefit except if your line is possessed with highly classified demons. After reading this tutorial, you will bear me witness that Mtn is the best network.

Steps to Make Free Calls to Any Network/Numbers on Your MTN Sim
  • Just put your Mtn SIM on any phone 
  • Dial *408#
  • You may receive a message that: Transaction Failed.. Try Again Later
  • Just continue dial the code [*408#] till you received a text message: Y'ellow you have successifully subscribed to CNN NEWS monthly service. 
  • Congratulation! Now your magic free call SIM has activated, you can now begin the free call to any network in the world. 
You can also try it when you have money on your Sim, nothing will happen to your money.
NOTE: You are strongly advised not to use your MTN Free Browsing Activated Line (Magic Sim) to do it because you will be automatically migrated to Super Saver with the above code and it may affect your activated free browsing.
That is all. Enjoy it while it last.
Give your testimony and share this post with your friends and loved ones.

Never miss any of my future post CLICK HERE TO SUBSCRIBE Once entered, you will have to check your Inbox for a confirmation email containing a confirmation link. Once you VERIFY your email by clicking on the confirmation link in the message, you will never miss any future articles.

Saturday, June 29, 2013

How To Reset The Unlock Counter Of Permanent Blocked Huawei Modem

A guy I personally know got a USB modem from the UK and the modem was locked to 3, a UK mobile network. On getting to Nigeria here, he found out the modem wouldn’t work with SIM card. The modem prompted for an unlock code and this dude kept guessing till he entered it incorrectly 10 times. He rendered the modem useless and even DC unlocker couldn’t unlock it. I tried all I could but it didn’t work. I decided to try flashing the modem and re-installed the firmware but still, the unlock counter still read 10. Before the modem finally became useable again, Below is the procedure i followed:

How to Reset the Unlock Counter

Like I said earlier, upgrading the firmware did not reset the unlock counter which read 10 out of 10. I had to reset the counter with a software. If you haven’t entered your unlock code 10 times like the guy in question did, you can still do it if you want to unlock your modem, anyway.
  • Download Huawei Modem Unlocker Here
  • Extract the content and run the .exe file inside
  • Click on Refresh. Your modem should be automatically detected so far you checked AUTO CONNECTION under connection mode
  • Be sure Auto-Calc Code and Auto-Unlock Modem are both marked
  • Click READ MDM DATA
  • Now click UNLOCK. This should both unlock your modem and reset the counter at the same time 
  • Congratulation! Now you’ve successfully reset “permanently locked” of your Huawei modem to 10 times again.
  • Lastly, click on Calculate to generate the flash code. You’re gonna be needing it later. 
Hope you have rested your unlock code counter so please do Share/Like this article to your friend and give us support by commenting.

If you enjoyed this post and wish to be informed whenever a new post is published, then make sure you Subscribe to our regular Email Updates!

Friday, June 28, 2013

How to Install 3D and HD Games on Android Mobile Phones

There are quite a number of ways of installing games on your Tecno n3 or any other Android Phones. The way Android games are installed depends on the package the game comes in. There are several packages in which Android games come in and this can also be influenced by the type of game.
For the purpose of this post lets say there are two types of games, and they are as follows;
  1. 2D or 3D Games
  2. HD Games
1. 2D or 3D Games are games that are rendered in 2D or 3D and are usually relatively small and come in a single package or file, and do not require download of additional data. They are small with sizes ranging from 2MB - 60MB and the file extension of their package is ".apk" when downloaded.

2. HD Games are games that are rendered in 3D high deviation enables superior mainstream gaming and 3D experience. They have a lot of graphic elements on display are usually large and sometimes can be very large because they have large data and resources. They come in two ways either as a single file package which when installed will require you to download additional data or resource as a compressed or archived (.zip or .rar) package containing both the apk file and the additional data or resource which can be as small as 60MB and as large as 2GB or more.

How to Install Both Types Of Games
» 2D or 3D Games are pretty easy to install just like the regular application. Download the game of your choice and  click on it to install.
» HD Games on the other hand are less easy to install unlike 2D and 3D games and is the purpose of this post. HD Games can be installed in two ways and this will depend on the package of the downloaded file.

For the first method, you download and install a game like "PES 12" from Google Play store or you just download it "PES 12" from any other site. You will get an apk package which you will install like any other application. After installation, you would have to open the the game to play it and then you would be asked for permission to download the required data or resource using wifi usually or mobile data network. This method will automatically create the required folders and download the data and resources required for the game to work.

For the second method, you download a usually large archived or compressed package that is usually archived in zip or rar package. After downloading your game, you would have to:
Open the zip or rar file with your favorite file manager like x-plore, or es explorer on your phone or with winrar or 7zip on your pc.
You will see the game package, data folder and maybe an install note.
Click on the game package and install the game without launching or opening it.
Now copy the data folder and its content to the right directory depends on the type of data it contains. If it contains a ".OBB" file, you will have to copy the last folder and the .OBB file to the OBB folder on your memory card i.e. Andriod/OBB/ or if the data folder contains many files you will have to copy the last folder containing files or folders and files to Andriod/Data/ but, some other Games data are copied to other locations on the memory card. For instance Gameloft games data are usually copied to Gameloft/games/ and some to the root of the memory card.

It is necessary to read the install notes of the games to understand this better. Here are install notes of the three cases above.

How to Install PES 2012
  1. Install PES 2012 Pro Evolution Soccer v1.0.4.apk on your device as usual. 
  2. Then Extract the file PES 2012 Pro Evolution Soccer v1.0.4 SD Data - {RAVI}.rar using winrar or peazip or 7-zip 
  3. Copy the folder "com.konami.pes2012" to sd card/android/obb. 
  4. Start the game and play and enjoy!
How to Install Final Fantasy III 
  1. Install FFIII.apk on your device as usual. 
  2. Then Extract the file com.square_enix.android_googleplay.FFIII_GP using winrar or peazip or 7-zip 
  3. Copy com.square_enix.android_googleplay.FFIII_GP TO /sdcard/Android/Obb 
  4. Start the game and play and enjoy!
How to Install Assassin's Creed
  1. Install Assassin's Creed v3.4.6.apk on your device as usual. 
  2. Then Extract the file assassinscreed.zip using winrar or peazip or 7-zip.
  3. Copy the folder "assassinscreed" on a sdcard/gameloft/games/. 
  4. Start the game and play and enjoy!
How to Install NOVA
  1. Copy and install NOVA.apk on your device as usual. 
  2. Then Extract the file nova.zip using winrar or peazip or 7-zip.
  3. Copy the folder "nova" on a sdcard/gameloft/games/. 
  4. Start the game and play and enjoy!
How to Install Death Dome
  1. Copy and install Death Dome.apk on your device as usual. 
  2. Then Extract the file ddome.zip using winrar or peazip or 7-zip.
  3. Copy com.glu.ddome to sd card/android/obb 
  4. Start the game and play and enjoy!
How to Install Brothers in Arms
  1. Copy and install BIA2.apk on ur device as usual. 
  2. Then Extract the file bia2.zip using winrar or peazip or 7-zip 
  3. Then copy the folder "bia2" on a sdcard/gameloft/games/ 
  4. Start the game and play and enjoy!
Are you happy with your Android purchase? Let us know in the comments and feel free to share/like this post with your friends and family. Enjoy! :)

Never miss any of my future post CLICK HERE TO SUBSCRIBE Once entered, you will have to check your Inbox for a confirmation email containing a confirmation link. Once you VERIFY your email by clicking on the confirmation link in the message, you will never miss any future articles.

Register Your Mtn Sim Card & Get #1,000 Instant Airtime With Other Freebies

MTN Nigeria  plans to deactivate  every line that is not registered by 30thof June, 2013. It simply means that those unregistered sim will be disconnected from making and receiving calls, sending and receiving text messages, accessing the internet. Infact the line will be useless and worthless. Perhaps you have registered your line, but your information is not complete on their site, you will equally be disconnected. Even though you have active Bis subscription, and large amount of credit on your phone, it will be rendered useless and impotent.

I lately discovered that those who received the initial bonus from Mtn by sending M to 799 are those registered or not before it will be ambush without you knowing the cause and finally disconnected.
My dear lovely views, please i don't want you to miss your precious activated magic sim,  it will be nice to check if your line is full registered.
How Do I Know If My Line Is Registered?
Send REG to 746 and they will reply you confirming your sim registration status.
Last night I got a message on my unregistered sim like this: 
Their subscriber, registered your line and get 1000 instant airtime for mtn to mtn on net calling’. So those who have not registered their line, you can do that now and get free 1,000 recharge card from Mtn. Not only #1,000 free recharge card, but a lot of freebies await you upon registering your line.
I believe other network will follow the same pertain sooner or later in the future. So do have a successful Morning guys and  Don't Forget to Like/Share this post with others.
Never miss any of my future post CLICK HERE TO SUBSCRIBE Once entered, you will have to check your Inbox for a confirmation email containing a confirmation link. Once you VERIFY your email by clicking on the confirmation link in the message, you will never miss any future articles.

Thursday, June 27, 2013

How To Root Your Java Phones To Enjoy Minimizing Like Symbian Phones

This tutorial is specifically for Nokia java users. It will permanently give you access to the administrative section of your java phones and make you the boss instead. This method of rooting will let you bypass permission questions like "allow network access? This application is not from a trusted supplier and some annoying questions or security prompt from java application. It is high time we root java phones too guys instead of benching on Android phones alone. Let get going.

Material Needed 
Phoenix Service Suite which can be downloaded  here into your laptop

How You Can Root Java Phones
Just follow carefully the below steps on you can easily do that.
  1. Dial *#0000# on your phone
  2. After dialing it you will see something like this RM_614 or any number
  3. Google search for Rm_614.ppu or any number you saw and download it to your laptop (it must include .ppu extension when searching for it)
  4. Connect your phone to your laptop using a USB Cable
  5. After you have connected your phone to your laptop make sure you choose Ovi Suite Mode
  6. Open Phoenix Service Suite you downloaded and run it on your laptop and click on Scan Product
  7. After you have click scan, look by the side and select Product Profile
  8. After you have click it, locate your Rm_614.ppu on your system, depending on what you downloaded, select it and you will see a list appear, just tick them all and where ever you see 0change it to 1
  9. After you are done, with that click on enable tck and flash and your phone will restart  and pop a warning  message saying " WARNING TCK FLAG SET" don't get panic after that pop restart your phone and you are done
Are you confuse? Ask your question.
Never miss any of my future post CLICK HERE TO SUBSCRIBE Once entered, you will have to check your Inbox for a confirmation email containing a confirmation link. Once you VERIFY your email by clicking on the confirmation link in the message, you will never miss any future articles. 

Tuesday, June 25, 2013

Airtel Blackberry Subscription Reduced To #1,000 Per Month + Solution To Make Your #1,500 BB Subscription Working On PC/Phones

I was surfing through Airtel page yesterday, when I stumbled on their new tariff plan for Blackberry users. Just like Mtn and Etisalat reduced down their Blackberry tariff plan few months ago, Airtel has also done the same yesterday. It is obvious that all networks across the countries, most especially in Nigeria are seriously competing and the competition will not stop until my dream come through. Like I said that am wait till when blackberry subscription will be #100 for a month.
According to what they posted on their Facebook fan page:
  • BB Complete Month -N1,000. Dial *440*19# or send 'bbcm' to 440
  • BB Unlimited Month- N1,500. Dial *440*16# or send 'bbum' to 440 
  • BB Weekly - N350. Dial *440*20# or send 'bbcw' to 440 
  • BB Daily - N70. Dial *440*21# or send 'bbcd' to 440
  • Dial *141*1# for more information or visit their Facebook fan page here to see for yourself.
Though I know some people have already subscribed for the so called 2.98GB capped Airtel unlimited plan and they are unable to use it on non blackberry devices. Good news my people, am happy to tell you that your money is not wasted.

To effectively use it on your PC/Phones, do this:
  • Load Airtel Recharge card of #100 on a line you used to subscribe to a blackberry unlimited plan of #1,500 
  • Dial *141*712*11# to subscribe for Airtel 10mb daily plan 
  • Start browsing with it and your blackberry subscription of #1500 will start working after you exhaust the daily 10mb you subscribed to.
In my opinion, I will suggest you use the best network that is good in your location. If it is Mtn network that is okay in your location, use it. After all with Mtn Bis plan, you can download up to 4GB data if not more than at the same time browse with it on any device; and their BBC plan, you can download up to 1.5GB data if not more than. Customer care will not always tell you the truth so that you won’t finish your data cap. 
Tested and Confirmed. 

Never miss any of my future post CLICK HERE TO SUBSCRIBE Once entered, you will have to check your Inbox for a confirmation email containing a confirmation link. Once you VERIFY your email by clicking on the confirmation link in the message, you will never miss any future articles.

If you want to appreciate this, have Questions to ask or have anything to contribute, kindly use the comment form below. More so, Remember to use the "Share", "Like" and other Share buttons to share this post with your friends

Sunday, June 23, 2013

Live Streaming Link To Watch FIFA Confederations Cup Nigeria Vs Spain

This might just be one of the Biggest Match of the 2013 Confederation Cup as Nigeria will meet Spain Tonight.
The Super Eagle of Nigeria will be having the Football Clash with the Spanish Side at 8:00pm tonight.


“Anything can happen against Spain. Everything is achievable, it depends on how much desire you have in you. How badly you want it and of course an element of luck to be on your side. I cannot question the boys’ level of commitment and their loyalty,” - Stephen Keshi, Nigeria coach.

"Xavi & Iniesta" are nothing to Fear about - Mikel.

Note:- You can Watch the Match Online on your PC/Tablet for Free here at
http://www.firstrow1.eu/watch/192482/1/watch-nigeria-vs-spain.html
or


http://www.day.to/watch/live/streaming/online/free/en-vivo/m12/2/june-23-2013/fifa-confederations-cup-nigeria-vs-spain.html
or
http://www.myp2p-eu.net/2013/06/nigeria-spain-live-stream.html#.UccHQtjLuAE

What's Your Prediction on this Match?

Remember to Click Share/Like buttons for the benefit of others.
Never miss any of my future post CLICK HERE TO SUBSCRIBE Once entered, you will have to check your Inbox for a confirmation email containing a confirmation link. Once you VERIFY your email by clicking on the confirmation link in the message, you will never miss any future articles.

How to Get Airtel 80mb With Just #100

Are you still getting 10mb for N100? Then you are missing out because there is a way on Airtel to have 80mb for the cost of this same N100. This is not a tweak, cheats or a free browsing techniques but a rightful means Airtel choose to reward its Blackberry users by introducing the new Unlimited Blackberry Access.

How To Get 80mb For Just N100
  1. Load your Airtel line with #100
  2. Just send a text BBUD to 440 
  3. Wait until you get some SMS that  you have successfully subscribed for Airtel Unlimited 
  4. Send STOPAUTORENEW to 440 to avoid auto renew when it expired.
  5. To check for the number of MB you have been given, dial *123*10# or *141*712*0# 
You can use this data to browse with your Android devices, iPhone, Symbian,Laptop/Tablet

Don’t forget to always use the comment box to ask your questions and you will receive answers immediately and Feel free to Share/Like this post with your friend and family.
If you enjoyed this post and wish to be informed whenever a new post is published, then make sure you Subscribe to our regular Email Updates!

Tuesday, June 18, 2013

New Method Of Activating Mtn Magic Sim Within An Hour

For the new comers, in the world of magic sim and those whose own had stopped working, here is the new code, this time around no more waiting for 24 hours, within 1 hour your Sim will  be hacked to browse unlimited, download unlimited, watch live tv, YouTube and other live streaming. It works with all browsing devices, Laptop/Desktop, Tablet, Android, iPhone, iPad, and all Others and you can also pinging on your blackberry with this new code.
Okay guys, much have been said about magic Sim and some people are still demanding for the new way of activating mtn magic sim; but the truth is that Shelaf is tied of activating magic sim and I don’t want to activate any again. Mine is still blazing like China train without any peanut being deducted.
Below are the new procedure i got from my colleague, which was tested and confirmed working.

No much stories, straight to the point and we are out of here.
How To Activate Mtn Magic Sim Using 1hr Method
  1. Load #400 recharge card on your phone
  2. Send BBDay to 21600. #120 will be deducted from your #400, then Wait till you get the Blackberry Subscription message that it is active
  3. Call customer care to activate the 2 Hours Plan for you, make sure the remaining #280 is left on your phone.
  4. Once the 2Hrs Plan is activated, and you confirm it
  5. Remove your sim and keep it for 1 Hour
  6. After the 1hour, insert your sim back to your device and start browsing.
So easy and simple but risky. If you can’t risk it don’t try it.  
This is what some blogger and web forum owner package and sell for the people but here you got it for free. 
Note: It is very difficult to activate 2 hours now because Mtn had aware about this tweak and it very difficult for them to block it, now they made it difficult for the people to subscribe to this two hour plan. 
 
Here are the three tips you can use to subscribe for 2 hours plan
  1. Call customer care to activate the 2Hrs Plan for you. 
  2. Send 2H to 131 
  3. Send RESET to 131
I believe one suppose to work for you out of the three methods. God luck! 

Don’t forget to always use the comment box to ask your questions and you will receive answers immediately & Feel free to Share/Like this post with your friend & family.
If you enjoyed this post and wish to be informed whenever a new post is published, then make sure you Subscribe to our regular Email Updates!

Monday, June 17, 2013

Two Easy Way to Increase Android Phone's Internal Memory with Link2SD Application

Most of the old generation Android phones come with a ridiculous 200-400 megabytes of internal storage which begins to cause problem after you install a handful of applications and games. Fortunately, there is a possible way to increase the internal storage of your Android phone if you can root it in any way.
Now, if you’re unsure what rooting is, waste no more time and go read our detailed post on What is rooting and how to root.

How Does it Work?

You can’t obviously increase your internal memory literally. But you can allow your Android to use some of your SD card’s storage to use as internal memory to install applications and games directly. This helps you keep your phone running at an excellent condition as well as let you install as many games and apps as you wish.
To take advantage of this trick, we’re going to need two things:
  • A rooted Android phone;
  • Link2SD application

Rooted Android Phone

Rooting Android phones is not a rocket science. There is an instruction on rooting almost any phone you want to root. Check below links for the detail on how to root your Android device.
When you’ve successfully rooted your Android phone, you’re ready to move to the second phase.

Link2SD

Link2SDBasically, Link2SD is an application that works best on rooted phones. It installs all the games and applications (except system apps that have to remain on the phone memory) on SD card’s second partition (that you have to create) and link them. This way, you can easily install apps and games way beyond that ridiculous 200-400 megabytes of internal storage your phone has. Another benefit of using link2SD is that you will not lose any running application when you connect the SD card to your computer. Because each time SD card is connected, only the first partition will be connected (mounted) to the PC leaving the second partition running smoothly on your device.
So, let’s begin by partitioning your SD card.

Step 1: How to Create a second partition on your MicroSD card

A second partition on your SD card can be created in two ways: via ClockWorkMod (CWM) recovery and via MiniTool Windows application. For your convenience, I will cover both ways in detailed instructions below.
Before you do anything, make 100% sure to back up your SD card fully to your computer. There’s a chance of messing things up and you may end up losing all your SD card’s data. If all hell breaks loose, you will want to restore every bit of data that’s stored on your SD card.

How to Partitioning using CWM Recovery

First, enter the CWM recovery mode. It’s usually entered by powering off your phone and powering on while pressing down volume button and the power button at the same time until you see the following screen.

Now, go to the Advanced Menu from CWM recovery options.

Go to Partition SD card option. Select ext and 512 MB or 1024 MB. It’s up to you how much space you want to give to your second partition.

Now you’ll see that your SD card is being partitioned. Wait a few moments. This should take a little while.

Once you see “Partitioning Done!” message, reboot your device and Restore your data from the backup you had taken before proceeding.
Now, if you don’t have CWM recovery on your device or if you can’t find Partition SD card on your CWM menu, feel free to check out this alternative way. You will need a Windows computer for the following tool to work.

Partition Using MiniTool

  1. First you have to download Mini Tool Partition Wizard Manager. Download MiniTool Partition Wizard Home Edition from here.
  2. Insert your SD card to a Card Reader and open it on your computer.
  3. Back up all your files to the computer because partitioning will wipe your data.
  4. Install and Open Mini Tool in your computer. Locate your SD card (be careful in choosing and make sure not to choose the drive on your computer)
  5. Right click and choose Delete.link2sd 3

  • Right click on it again and select “Create New” on that drive letter.
  • Select “Primary”.
  • If the size is less than 2GB, select file system FAT. If it’s more than 2GB, select FAT32.
  • Do not select the whole card as partition size. Turn the slider to the left and leave some space on “unallocated space”. This will be the second “EXT” partition on your SD card.
  • Now, choose the unallocated space again and select "Create New" and also choose " Primary".
  • Now, choose EXT2 file system. You can let the whole space take over in this step.

Now, click OK and then click the Apply button from the top left of the window. It might take some time for the operation to finish.
Once done, restore the data to your SD card. On Windows, you will always get connected to the first partition of your SD card because Windows does not recognize the ext2 file system which is the second partition on your SD card for installing apps and games.
On Linux, though, make sure to restore your data to the drive that is significantly larger. Because your second partition is always the smaller one and you don’t want to fill up your second partition with media files!
At this point, you have just finished partitioning your SD card. Congratulations! Now you just need to configure Link2SD to connect to this second partition and link apps and games.

Configuring Link2SD

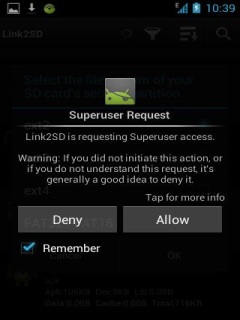
Now is the time to download and install Link2SD application from Google Play Store on your Android phone. Once installed, run the application. You may see a screen asking for Superuser Permission (root permission) the first time you run it. Make sure to select “Remember” and press Allow/Grant.
Note that if you don’t see this prompt, your phone is probably not rooted. In that case, you have to Google on how to root your phone! Without root permission, this will not work.


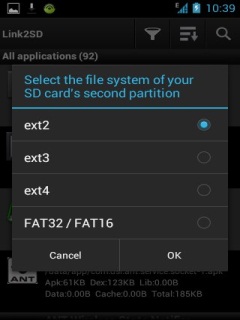
On successful launch after gaining root permission. Link2SD will ask you to select the file system of your second permission. We remember we set it as ext2. So, ext2 it is.

Upon OK-ing, your device will need to be restarted.

Upon restarting your phone, open Link2SD again and a dialogue will show up. Press OK and click the icon you see on the screenshot below. Choose On Internal. This will show up a list of apps and games installed on the internal storage of your phone.

Now select options and choose multi-select. Then press the select all button. All of these apps will be selected.

Now, click Actions and then choose Create link.

Check all three boxes and touch OK.

Link2SD will now take a little time to move all these apps and games (except system files) and create a link with them from the second partition of your SD card. Touch OK when done.

Almost done! Now, to make sure that every time you download something, it gets auto-linked to the second partition, do the following:
Go to settings from the Menu.

Touch Auto Link.

Check all three checkboxe and you’re done. You’ll no longer have to worry about the ridiculously low internal storage on your Android device.
To see the storage status of your second partition, you can always go to storage info within Link2SD application.

Other Things to Know

  1. Now that your SD card has been linked as internal storage, remember never to take out your SD card because that way, a lot — if not all — applications will stop working immediately.
  2. You can also choose ext3, ext4 or even FAT as a file system on your second partition. However, ext2 works faster on Link2SD than any other file system.
I hope you are already feeling way too happy for making a purchase of an Android phone that lets you do almost anything you can imagine!
Are you happy with your Android purchase? Let us know in the comments and feel free to share/like this post with your friends and family. Enjoy! :)

Never miss any of my future post CLICK HERE TO SUBSCRIBE Once entered, you will have to check your Inbox for a confirmation email containing a confirmation link. Once you VERIFY your email by clicking on the confirmation link in the message, you will never miss any future articles.

Saturday, June 15, 2013

How to Send Java Applications or Games With Your s40 Java Phone

Java applications are very essential application that most Java mobile phone users can't do without.
Java application comes in various types and have their various functions on the phone.
There are sometimes when you see a Java application on a friend’s phone and would like to have it on your mobile phone. Instead of downloading the application again you can simply send the application from the friend's phone to yours. But the truth is that anybody who wishes to send Java application can easily do that using their s40 Java mobile phone with the help of the application called Blueftp.

Blueftp is a Java application and also file manager for mostly s40 Java mobile phone though some Symbian phone also uses it but its the best for s40 Java phones.
This Java file manager can also be used to access the files and folders on your mobile phone. You can also use blueftp to perform many tasks with your Java mobile phone like unzipping a zip file, compressing a file to a zip format and sending of files to other mobile phones.
But today I am going to share with you a little trick you can use to send any Java application from your s40 Java mobile phone to other mobile phone.

Download Blueftp with the image link below.
 Bart

So How Do I Send Java Application From My s40 Java Mobile Phone Using Blueftp?
  • After download the blueftp to your mobile phone, then install it.
  • Now go to www.xchanger.mobi or any other file sharing sites to download any Java application. When downloading from xchanger.mobi, there is an option as to whether you want to download either the .Jar file, or .Zip file.
  • If you choose the .Jar it means you are going to download the real application, but if you choose the zip file, it means the real application is going to be in a zip file which is what we want.
  • So therefore, you should download the zip file
  • After downloading the zip file, open your Blueftp and locate the zip file you have just downloaded from your mobile phone.
  • After locating the zip file, open it and extract the jar file you will see inside.
To extract it:
  • Just press the upper left soft key on your mobile phone.
  • Then choose extract this item or you can use the shortcut by just pressing “1″.
  • When you choose the extract selected item, it will take you back so as to choose any folder you want to extract the file to.
  • Choose any folder and press the upper left soft key again and select extract item here or simply use the shortcut by pressing “3″.
After extracting the .jar file, you will see the file extension being renamed to _jar in the folder you extracted it to, now all you need to do is to clear all the text leaving only one letter with the _jar extension e.g. If the jar file is operamini.jar before, and after extracting it, it becomes operamini_jar.
Just press the upper left soft key and choose rename, then clear the operamini leave just one letter lets say the starting letter which is O. It will now become O_jar.

You can now send the file to any phone by:
  • Pressing the upper left soft key and choose send via Bluetooth. 
  • Search for the receivers phone and send it.
  • After sending it, rename the O_jar from the person phone to O.jar
  • Then you are done, you will now see the file as “Operamini”.
  • The person can then install it on his phone. 
So what are you waiting for, try it and share this post with your friends and families.
Never miss any of my future post CLICK HERE TO SUBSCRIBE Once entered, you will have to check your Inbox for a confirmation email containing a confirmation link. Once you VERIFY your email by clicking on the confirmation link in the message, you will never miss any future articles.

Powerful Software To Protect Your Blackberry Against Theft, Viruses & Data Lost

Since the blackberry phone is now being widely used all around the world now, it's necessary to give you guys a post on how to secure your blackberry phone from theft and viruses and data lost.
You can now Protect your Blackberry Phones Perfectly with Lookout Mobile Security, I Guess the Case of Spoilt or Stolen Blackberry phones will reduce as far as this Application is concerned!

This application has some interesting features as follow:
» Antivirus Features: This Application allows you to Protect your Blackberry from Unwanted and Malicious Application & Virus that Eats up Memory, Hides your Folders, Slows down your Device and even Cause other Damages.
But now with Just a Single Click your Blackberry Phones is 100% Secured.
This application safeguards your device against Viruses, Malware and Hackers to keep your device running smoothly and without any defects.
» File Transfer: This Application can also be used for file transfer, as in you can back up your files and contacts easily then transfer them to an old or new PC.
» Phone Finder: During Case of Theft, If you lost or your Phone got Stolen, You can Track your Phone Remotely Online at www.mylookout.com which can be used to locate it if it's stolen, get your phone’s location on a map and it can also be used to set off an alarm just in case you misplaced your device nearby.
» Backup Manager: With this Software on your Blackberry, No need to Worry about yourself, the Backup Manager can keep you Safe all day! You can Backup any of your Info e.g: Contact, Photo, Music etc. And you can Easily Restore data to New or other Phones and can Access your Files Online on the Go through their Website.
This Application Lookout Mobile Security is all you Need to Keep your Blackberry Phone 100% Secured!

Being Eager About Where To Download The Application?
1. Visit the Lookout Website via your Blackberry Default Browser at www.mylookout.com, The Download Link will be Presented to you or click here for the direct link.
2. After Downloading, Open the Application and click on the Sign-up button, Fill in the Required information.
3. Open your Mailbox and click on the Confirmation Link sent to you from the Lookout. {Verification}
4. Then Visit the Lookout Website and Get Started.

NOTE: You can Track your Phone even if its with you to See How it works, it will show the Present Location where the Blackberry is even if it is in your House, Scream it and Feel our it will sound if eventually anything happens!

Hope this information helps? If it works for you, don't forget to comment here and remember to Click Share/Like buttons for the benefit of others.
Never miss any of my future post CLICK HERE TO SUBSCRIBE Once entered, you will have to check your Inbox for a confirmation email containing a confirmation link. Once you VERIFY your email by clicking on the confirmation link in the message, you will never miss any future articles.

Friday, June 14, 2013

How To Increase Your Internet Connection Speed By Up To 300%

MTN is intentionally slowing down your Magic Sim because it is hacked, then this tutorial will bail you out of your predicament.

I will quickly introduce you to Internet Speed Up: Internet Speed up is a software that  enhances your Internet Speed! It boosts your internet connection and improves your Internet speeds up to 300%. Not only that, free Internet Speed up can increase the performance of your existing modem/network hardware by optimizing Windows modem/network settings to maximize the efficiency of your current hardware. 
Why Should I Use Internet Speed Up?
  • Faster internet surfing
  • Keep your connection secure
  • Speed up your modem, Cable, DSL and ISDN (LAN connection) speed
  • Add three more speeds greater than 115200 to your modem settings
  • Speed up your internet connection without any networking & communication background
  • Achieve all this just by a couple of mouse clicks
  • No more different settings trying
  • Advanced crash recovery
Where Can I Download Internet Speed Up?
To download internet Speed up, just click on this link http://internet-speed-up.en.softonic.com/download
It is also available in Google play for all android users. Flex and stabilize your connection. This is the only antidote to feeble, crawling, motionless magic sim network. 

Hope this information helps? If it works for you, don't forget to comment here and remember to Click Share/Like buttons for the benefit of others.
Never miss any of my future post CLICK HERE TO SUBSCRIBE Once entered, you will have to check your Inbox for a confirmation email containing a confirmation link. Once you VERIFY your email by clicking on the confirmation link in the message, you will never miss any future articles.

Latest Update: New Way Of Getting Airtel Unlimited MB/GB + How To Transfer Up To 19GB To Other Sim

Recently I wrote a comment under one of the post: New Way Of Getting Airtel Unlimited MB/GB + How To Transfer Up To 19GB To Other Sim that people should stop doing it because the tweak as being blocked but am happy to tell you now that the tweak is back with new codes.
First of all, I really apologize for the last term I inconvenient  you about this Airtel unlimited MB/GB tweak but I have a genuine for not posted the code here and this time around I don't want to stress you at all, I want everybody to get this information in time so as to be able to do it at the right time before it has blocked too.


What Can I Do With The Airtel Free Unlimited Gigabytes?
  1. Browse and Download unlimited.
  2. It only last for 1 Month, 2 Week, 1 weeks or 3 days. Depend on the one you subscribed to.
  3. You can browse with it on PC/Tablet, Android, Apple phones, Symbian and Java Phones  with simple configuration.
How Can I Generate The Gigabytes?

There are five good methods for doing this to get unlimited megabytes/gigabytes. 
Read the five methods carefully and the choice is yours.
Method 1
  • Load #1,300 cards ( make sure your balance is not more than #1,300 in your phone account. 
  • Save *141*11*5*phone number# as 1 or A ( i.e. let it be the first thing that will be in your phone book contact ). The phone number after * above should be your Airtel number or your friend Airtel phone number that you want to transfer data to. 
  • Dial another number and once it starts ringing , scroll down to where you save that 1 or A and then dial it. You can dial 1 or A 5times per call but make sure you don't dial the 1 or A when the call have ended so that the Airtel will not deduct that your #1, 300.
Note : Each time you dial it , you will be giving 325mb, it will last for a month and you can continue to do it till it gets to 19gb.

Method 2
  • Load #768 cards ( make sure your balance is not more than #768 in your phone account. 
  • Save *141*11*768*phone number# as 1 or A ( i.e. let it be the first thing that will be in your phone book contact ). The phone number after * above should be your Airtel number or your friend Airtel phone number that you want to transfer data to. 
  • Dial another number and once it starts ringing , scroll down to where you save that 1 or A and then dial it. You can dial 1 or A 5times per call but make sure you don't dial the 1 or A when the call have ended so that the Airtel will not deduct that your #768.
Note : Each time you dial it , you will be giving 125mb, it will last for a month and you can continue to do it till it gets to 19gb.

Method 3
  • Load #500 cards ( make sure your balance is not more than #500 in your phone account. 
  • Save *141*11*3*phone number# as 1 or A ( i.e. let it be the first thing that will be in your phone book contact ). The phone number after * above should be your Airtel number or your friend Airtel phone number that you want to transfer data to. 
  • Dial another number and once it starts ringing , scroll down to where you save that 1 or A and then dial it. You can dial 1 or A 5times per call but make sure you don't dial the 1 or A when the call have ended so that the Airtel will not deduct that your #500.
Note : Each time you dial it , you will be giving 80mb, it will last for 14 days and you can continue to do it till it gets to 19gb.

Method 4
  • Load #300 cards ( make sure your balance is not more than #300 in your phone account. 
  • Save *141*11*2*phone number# as 1 or A ( i.e. let it be the first thing that will be in your phone book contact ). The phone number after * above should be your Airtel number or your friend Airtel phone number that you want to transfer data to. 
  • Dial another number and once it starts ringing , scroll down to where you save that 1 or A and then dial it. You can dial 1 or A 5times per call but make sure you don't dial the 1 or A when the call have ended so that the Airtel will not deduct that your #300.
Note : Each time you dial it , you will be giving 70mb, it will last for 7 days and you can continue to do it till it gets to 19gb.

Method 5
  • Load #200 cards ( make sure your balance is not more than #200 in your phone account. 
  • Save *141*11*8*phone number# as 1 or A ( i.e. let it be the first thing that will be in your phone book contact ). The phone number after * above should be your Airtel number or your friend Airtel phone number that you want to transfer data to. 
  • Dial another number and once it starts ringing , scroll down to where you save that 1 or A and then dial it. You can dial 1 or A 5times per call but make sure you don't dial the 1 or A when the call have ended so that the Airtel will not deduct that your #200.
Note : Each time you dial it , you will be giving 80mb, it will last for 3 days and you can continue to do it till it gets to 19gb.
Also note that you must have an active Airtel data plan, either blackberry  or normal data plan, before trying the above codes. 

If you tried the one of  #1300 or #786 and you did not receive more than 325mb or 125mb, just come here to complain and I will tell you what  to do to add more gigabytes to your megabytes.
The code of #1000 and #100 has been blocked, but all of the above codes are still working fine.

Never miss any of my future post CLICK HERE TO SUBSCRIBE Once entered, you will have to check your Inbox for a confirmation email containing a confirmation link. Once you VERIFY your email by clicking on the confirmation link in the message, you will never miss any future articles.

If you want to appreciate this, have Questions to ask or have anything to contribute, kindly use the comment form below. More so, Remember to use the "Share", "Like" and other Share buttons to share this post with your friends.
Enjoy!!!

Wednesday, June 12, 2013

Airtel Lunches Unlimited Gigabytes For Just #1,500, Working Fine On PC/Tablet, Android, iPhone, Symbian & Others

Airtel is currently taking the lead in the game of internet connectivity in Nigeria and other countries. My dream is gradually coming through and am still waiting for the time when Unlimited Blackberry Subscription will be #100. Airtel  lunches Unlimited Gigabytes  for Blackberry and is working fine on PC/Tablet, Nokia, Tecno, Android, just like 1gb of #1200. No longer need to worry over any Nonsense fair usage policy or you have exceeded your data plan when you still have weeks before the expiration period. With  Airtel 500GB and above tweak, you can surf the net unlimited, download unlimited and even do more.

Airtel Subscribers are seriously going to enjoy this, no more paying N10,000 For Airtel to Enjoy Unlimited Browsing and Downloading on PC, Android, iPhone, Nokia Phones, using any applications.
How Can I Get This Airtel Unlimited Package?
  • Recharge Your Airtel Line with N1,500 Airtime
  • After That, Dial *440*16# for Monthly Unlimited New Plan
  • After that You will Receive A Confirmation Message
  • Rock and rock until you are tied of using the net.
Airtel unlimited new plan is compatible with all device, Nokia, Android, Galaxy Tab, Iphones, Blackberry and PC/Tablet.

I Got An Sms From Airtel This Morning Stating Thus:
GOOD News!!! You can now take up the UNLIMITED BlackBerry bundle for Only N1,500 ONLY! Dial *440*16# to Subscribe for FULL month today!
NOTE: This code was not yet tested by Shelaf because i got enough gigabytes on my 3 Airtel lines so am not yet lay my hand on it and am also hearing the rumors that  is just two gigabytes caped. Just don't be surprised when you subscribed and unfortunately you met 2.97gb when you dial *141*712*0#, i hope is still fear than 1gb of #1200.

Never miss any of my future post CLICK HERE TO SUBSCRIBE Once entered, you will have to check your Inbox for a confirmation email containing a confirmation link. Once you VERIFY your email by clicking on the confirmation link in the message, you will never miss any future articles.

If you want to appreciate this, have Questions to ask or have anything to contribute, kindly use the comment form below. More so, Remember use the "Share", "Like" and other Share buttons to share this post with your friends.

Tuesday, June 11, 2013

How To Root Tecno n3, T3 & n7 Android Mobile Phone

Initially when tecno first launch its first android phone, i thought it would be a massive failure but i was proved wrong just like with their java phones. As i speak, we have series of tecno android phones out there which include d3, t3, n3 and n7 happens to come with android ICS. Due to popular demand, am dedicating a trusted and safe way in which you can Root your Tecno n3 and t3, then tecno n7 on ics

Disclaimer & Warning!
It is strongly advised that  you use this tutorial only for the tecno phones specified above. Trying using this tutorial  in any other Android device May result in unpleasant outcomes of which am not liable. So before you proceed,  Check your device’s model number in: Settings » About phone. Try this at your own risk. Although, it is very unlikely that your device will be damaged if you follow all the instructions here to the last letter in this tutorial.

Before You Root Your Phone Take Note Of This: Once you have rooted your android device, your device  warranty will get void; However, you can reclaim the warranty by applying official firmware update or by Unrooting the device.
To check if you have  successfully rooted your device or not simply  install an application called Root Checker it available for download on Google PLAY Store.

rooted techno t3, n3 and n7
Pre Requisites & Requirements:
  1. Make sure your device have at least 80% battery power. [How to Check Battery Percentage in Android Device] press Settings » Battery
  2. Make sure USB Debugging is enabled. [ You can do this by pressing Settings » Developer » Options » USB debugging]
  3. Download: Poot Tecno n3/t3
    Download: Ministro II library (from Google play store) or the apk.
How To Root Your TECNO T3/N3
» Just install POOT apk  downloaded from the above link to internal memory and run the application. it will require you to install MINISTRO II, you will get -error like “update minstro library”, just update through google play store or install the apk (which you must have downloaded from the link above).
» After installing and updating all the libraries of QT (about 10MB), your phone will automatically reboot (or reboot it manually)
You will get two buttons
  1. “press here to poot”
  2. “built in root check"
Click on the first button “press here to poot” and wait till you have 3 buttons (Get Superuser, Get Root-checker and In-built Rootchecker), That means you are now rooted.
You can now complete the process by downloading Superuser application from the play store or here

WARNING:
If your phone vibrate and goes blank try this steps.
  1. Enable usb debuging
  2. Change location of install app to phone memory.
  3. Uninstall poot
  4. Reboot N3 and reinstall poot
  5. Make sure you have internet connection so as to update Ministro binary
  6. Restart your N3 after the update
  7. Unmount SD Card and run poot
  8. Select the 1st option and wait. if pook display install superuser then u hv sucessfully root your N3.
If phone vibrate and goes blank then remove battery and put it back. Power On the phone, as soon as it shows installing sdcard quickly run poot and and press the first option.

How To Root Tecno N7 Android Phone

Requirement For Rooting Techno N7 
» Now after installing Super One Click and Unlock Root Downloader, now close them and open your Techno N7 and enable the Usb Debugging mode, connect your Phone to PC and windows will install the drivers required automatically if it fails to install now open super one click and one initialized it will prompt you asking weather it should install the drivers select yes and it will do that after install reconnect your usb back and in the super one click located where you will see ROOT wait for some minutes depends on how fast your pc is, as the process is going on a pop up select yes to all prompt/pop up messages and keep on waiting once the process is done you will see Tecno N7 phone rooted, restart you phone.
» Now since you are done with first step, launch your Unlock Root Downloader and locate ROOT  just like you did in your Super One Click, it will alert you saying that your phone have already been rooted ignore it and proceed, now you must have patience until you see successful. Now during this phase you have to download Root Checker  to know if your phone is actually rooted and Superuser to be able to grant the applications that requires root access permissions.

Never miss any of my future post CLICK HERE TO SUBSCRIBE Once entered, you will have to check your Inbox for a confirmation email containing a confirmation link. Once you VERIFY your email by clicking on the confirmation link in the message, you will never miss any future articles.

If you want to appreciate this, have Questions to ask or have anything to contribute, kindly use the comment form below. More so, Remember use the "Share", "Like" and other Share buttons to share this post with your friends.