Wednesday, November 28, 2012

Etisalat Latest Free Browsing on PC with Kemulator and Opera Mini

Introduction
Kemulator is definitely a must have for any body who like to use most of their mobile java applications like mobile web browser, opera mini, ucbrowser, games and many more on their Laptop/Desktop. Their are many Java Emulator for pc but Kemulator is one of the best when it comes to using mobile java applications on the computer especially browsing with Opera mini, this is because it gives you more features to use like:
1. Setting the weight and height for proper viewing and also it accept free browsing codes as you are using it on mobile phone.
2. The interface of Kemulator is user friendly and can be easily understood.
3. You can download with operamini using kemulator and see the file in Kemulator folder called “root” inside file folder.

How to Browse Free with Opera mini Using Kemulator on PC

First of all download the Required Materials with links below:
Note: Not all Opera mini are working fine with Kemulator on pc, the best among that can easily allow cheat is Cast Opera mini 5.1, so you have to use the link I provided to download it.

Now the Settings
Connect your Modem or Pc Suite with any Etisalat Setting
1. Create new folder on your desktop, name it Kemulator or any thing.
2. Extract the content of the Kemulator you downloaded into the folder you created on your desktop
3. Open the folder, double click Kemulator (it has phone logo among the files you see in kemulator folder) a window will popup
3. On the left end of the window click on View then scroll down and click Option
4. At the top right end you will see a sign like this ">>2" click on it, then Network
See the screenshot below:
Set it as follow:
-Proxy type: HTTP Proxy
-IP: 82.145.211.1
-Port: 80
-Username and password: Leave it empty
-Then click "Ok"
On the top left of the window click on Midlet >> Load jar…
Search for the folder where you saved the Cast Opera mini.jar you downloaded then open it and wait a bit for it to open.  
Fill it as follow:
-Custom HTTP Server: http://0000.0000.0000.0000:80
-Custom Socket Server: socket://0000.0000.0000.0000:1080
-FrontQuery: webpay.interswitchng.com#
-Host: m.opera.com
Clik Ok and wait for it to Installed. AFTER INSTALLATION BROWSE AND DOWNLOAD ANY LARGE FILES FOR FREE!
If you wish to use this with any other network apart for Etisalat may be Glo or Mtn i think you already know what to do.

As I said earlier in my in introduction that Kemulator allow the user to set the weight and height for proper viewing, below are the way to customize the weight and height of your Kemulator to your taste:
Open the Kemulator, then click on view, from the drop down click on option.
Set it as follow
Screen Width: 1357
Screen Height: 640
Leave others as it is and click Ok
You can use any weight or height but the one i specify is what i am using.
Now close Kemulator and reopen it, you will notice the size has increase due to the weight and height you adjusted.
Note: Make sure you adjust the screen size of your Kemulator first before other Setting because each time you try to adjust the screen size of your kemulator, the codes in your opera mini will disappear, which means you need to re-enter the codes.

Don't be the last to get updates: Subscribe now with your email to get latest update. 

If you encounter any problem during the process, use the comment box below to say your view and i will reply you as soon as possible. 
Don't be selfish, remember to click on any of the Share/Like buttons for the benefit of others.

Saturday, November 24, 2012

ETISALAT LATEST FREE BROWSING WITH OPNEXT 7 AND UCBROWSER


Recently i published Etisalat free browsing on opera mini 4.21 and opera mini 5.1, the cheat is still blazing like fire up till this moment, you may click here to view that. To all lovers of opera mini 7.0HandlerUI and Ucbrowsers here is the new tweak for them, blazing hot and very fast in downloading.
Just follow the below setting to browse free with your opera mini 7.0HandlerUI:
Download opmin_7.0HandlerUI.jar by click on below image. (You may skip this if you have Opmin7.0 installed on your phone) 
Bart
Create Setting with any of below ip and port 
  • IP: 82.145.211.1 or 82.145.210.160 or 195.189.142.132 
  • PORT: 80 
  • APN: etisalat 
  • USERNAME & PASSWORD: wap
Launch your Opera mini and insert below:
  • FrontQuery: webpay.interswitchng.com#
  • Proxy Type: HTTP
  • Proxy Server: m.opera.com 
FOR UC BROWSERS INSERT THE BELOW TWEAK
Download Uc8aHUI150Rev1.jar by click on the below image
Bart
  • IP: uc6.ucbrowser.com
  • PORT: 80
  • APN: etisalat
  • USERNAME & PASSWORD: wap 
Launch your Ucbrowser and input below: 
  • FrontQuery: webpay.interswitchng.com#
  • Proxy Type: Host 
  • Proxy Server: m.opera.com 
FOR S40 OR JAVA PHONES USERS
Create prov with the above ip and port and activate it as default setting.

 Never miss any of my latest update Click here to subscribe with your email address.

Your comment are very important to me, so as to influence me for this kind of post. Use the below comment box to express your view after the above codes as been tested and don't forget to use Share/Like buttons for the benefit of others.

Friday, November 23, 2012

ALL NETWORK AIRTIME TRANSFER AND THE FACTS YOU NEED TO KNOW ABOUT AIRTIME TRANSFER

Transfer is one of the means of topping up your GSM line. In transfer, a subscriber utilizes any of the means of recharging a GSM account, but then goes on to allocate a portion of the calling credit to another subscriber on the same network. The four major networks in Nigeria: Airtel, Etisalat, Glo and MTN, all operate transfers under various terms. MTN calls theirs Share 'n' Sell. For Glo and Airtel, it is Me2U and Etisalat Easy Airtime Transfer. Other recharge options include recharge cards, online top-up, ATM, VTU. Airtime Transfer allows you to transfer part or all of the balance airtime in your prepaid account to another prepaid account without burdening yourself with an immediate expense. It is convenient, as you do not have to go and look for a recharge card and input the long Recharge PIN before sending it to the recipient. It is flexible, as you are not constrained by the fixed denominations of recharge cards. You can recharge with such irregulars denominations as N58, N72, and so forth. It is secure, as the transfer transaction is PIN or password protected.

MTN Share and Sell is a credit transfer service provided by MTN Nigeria. It allows you to send credit from your prepaid MTN account to another MTN customer's prepaid account using SMS or USSD.
How to Set Up MTN Nigeria Share and Sell
MTN Nigeria Share and Sell is protected by a default password of 0000. Therefore, it is necessary to change the password before using the service to forestall unwanted use by a third party.
Changing Your MTN Share and Sell Password
This involves sending an SMS command to 777. The SMS should be in this format: "Default PIN [space] New PIN [space] New PIN" (without the quotes), and sent to 777. Assuming you want to change your PIN to 4242, compose a text like this, 0000 4242 4242 and send it to 777. You can also change your PIN using USSD like this: Dial *601*default PIN*New PIN*New PIN# Send/Ok, for example, *601*0000*4242*4242# Send/Ok . When the default PIN has been changed to a new PIN, you will receive a message informing you that your PIN was changed successfully.
Transferring Credit on MTN Network MTN Share and Sell SMS command code looks like this: Transfer [space] MTN Number [space] Amount [space] Password . For example, to transfer N250 to subscriber 0803 2222 333 and your password is 4242, Compose Transfer 08032222333 250 4242 and send to 777. Within seconds, you should receive a notification prompting you to confirm the transaction. Send the word, Yes to 777to confirm the transfer.
You can also transfer credit using USSD like this: Dial *600*Recipient’s Number*Amount*PIN#, for example, *600*08032222333*250*4242#. When the transfer has been completed, you will receive a message informing you that the transfer was successful. You can transfer a minimum of N50 and a maximum of N6,000 per transaction. You can transfer a cumulative amount of N50,000 per day.
Visit MTN website for more info.

Airtel Me2U
Airtel Me2U is a system developed by Airtel Nigeria that allows her subscribers transfer airtime value on-net, that is, an Airtel subscriber  can transfer a portion of their airtime to Airtel subscriber.
How to Step Up Airtel Me2U
The default PIN is 1234. I recommend changing your PIN/Password to avoid unauthorized transfer of airtime from your account. Changing Your Me2U You will be required to send an SMS command to 432 to have your Me2U password changed.
To change your Me2U password, send the SMS command, "PIN [space] 1234[space] New Password" to 432. Your composed text should have this form: "PIN 1234 4242" (without the quotes). 1234 is your default password. 4242 is the new password you want to change to. After sending "PIN 1234 4242" to 432, you will receive a notification that goes this way: "You new password is 4242".
Transferring Calling Credit on Airtel Network, To transfer airtime, send an SMS command in the following format: 2u[space] Airtel Number [space] Amount [space] PIN to 432. Assuming you want to transfer N200 worth of airtime to 0802 333 4444, SMS 2u 08023334444 200 4242to 432, where 7892is your new password. The Airtel beneficiary will receive a notification that their account has been credited with the relevant amount of airtime from your number. You will also be alerted to the success of the transfer.
What You Should Know About Airtel Me2U
You will be charged the cost of an off- peak SMS rate (N10 at the time of publication of this post) for each successful transfer. Transfers must be on- net, that is, effected within the Airtel network. Limitless number of transfers is feasible You can also prompt other Airtel subscribers to send you airtime using the Credit Me service by dialing *141*8*recipient's number#. The recipient will receive an SMS from your number which reads: "Please Credit Me". Visit Airtel website to get more details.

Glo Nigeria Me2U
With Glo Me2U, you as a Glo Subscriber, can transfer airtime to another Glo subscriber. Glo Me2U is just another recharge option.
Setting Up Glo Me2U Glo Me2U
It requires activation before use. Activation involves sending an SMS code to a specified number and setting up a new password by executing a USSD command. The default Glo Me2U password is 00000. To actvate Glo Me2U, SMS the word, "Act" to 131. You will be notified that the service will be activated within a day. When it is activated on your line, you will receive an alert that your line has been activated. It is time to set up a new password. Setting Up a New Glo Me2U Password Like earlier pointed out, the default Glo Me2U password is 00000. Changing your password is highly recommended to prevent unauthorized use. To change your password, execute the USSD command, *132*00000*New Password*New Password# Send/Ok. If you want to change your password to 51512, for example, input *132*00000*51512*51512# and press the Send or Ok button. You will be informed that your password change was successful.
Transferring Calling Credit on Glo Nigeria Network
To transfer airtime, use the USSD command, *131*Glo Number*Airtime Amount*Password# Send/Ok. Glo number represents the beneficiary Glo subscriber number. You may want to input it without the leading zero (0), that is, 805, 807, 707, etc. instead of 0805, 0807, 0707, etc. An Example To send N200 to subscriber 0805 555 6666, input *131*8055556666*200*51512# and Send/Ok, assuming your password is 51512. Visit Glo website for more information.

Etisalat Easy Airtime Transfer Service
Etisalat Easy Airtime Transfer allows subscribers on the Etisalat network to electronically transfer airtime from the existing credit on their prepaid account to another prepaid account.
Setting Up the Etisalat Easy Airtime Transfer Service
Activation involves executing an USSD command. The default password is 0000. However, to change yours, dial: *247*0000*New Password# Send/Ok. For example, to change your PIN to 2345, input *247*0000*2345#Send/Ok . This password is also used to protect your transactions and special services such as call barring.
How to Transfer Credit on Etisalat Network
The easy way to transfer credit on Etisalat, use the USSD command, *223*Password*Amount*Phone Number#. To transfer N250, for example, to subscriber 0809 222 6666, input *223*2345*250*08092226666# and press Send/Ok.
Note that you must have at least 10 Naira balance remaining after subtracting the amount you wish to transfer for the credit transfer to work.
Visit Etisalat website to get further details.
Finally Airtime transfer is not reversible. Recall that all the above instructions are just examples. You can use any 4-digit number as your password or a 5- digit number in the case of Glo. Just choose a number that is difficult for others to guess, but easy for you to remember. Once you have changed your password, the new password should be used for transfer transactions.
You can always change your password if you feel it has been compromised. In the event that you want to change your password, your current password will assume the place of your default password in the format given for each network for password change. For example, if you have already changed your MTN Share and Sell password from the default 0000 to 4235 and you want to edit it again to 6672, compose a text like this, 4235 6672 6672 and send it to 777, not 0000 6672 6672 this time because your current password is no longer 0000. This principle also applies to other networks. Airtime transfer services provided by all the networks are also accessible via their Service Menu on the phone.

Never miss any of my latest update Click here to subscribe with your email address.
If you find this published useful then click on any of the SHARE/LIKE buttons below for the benefit of others.

Friday, November 16, 2012

BROWSE AND DOWNLOAD FREE WITH AMAZING SPEED ON YOUR MOBILE WITH ETISALAT SIM

Most of my 2go friends have been asking me about latest free browsing tweak, this post was made to serve as an answer to their request. Below is the etisalat latest tweak, this tweak was tested and working fine with Opera mini 4.21b14HandlerUI and Casts Opera mini 5.1, as am posting this tweak it is been testing to download a file of 322.8mb and the speed is very high, it also work with #0.00k.
See the screenshot below of the file am downloading:
Without much talk, below are the link to download the opera mini to power up this cheat
 Opmin4.21b14HandlerUI.jar 
Opmin5.1_Rebuilt.jar

Create new setting with below
-APN: etisalat
-IP: 82.145.211.1
-PORT: 80
 Java user create prov with the above ip and port

After that Insert these tweaks in your Opera mini
-HTTP Server: http://000.000.000.000:80
-SOCKET Server: socket://000.000.000.000:1080
-FrontQuery: webpay.interswitchng.com#
-Proxy Type: Host
-proxy Server: m.opera.com 
Install your opera and begin enjoy fastest free browsing and downloading with etisalat. 

Leave your Comments and Suggestions after testing the above codes and don't forget to hit the Share/Tweet or Like buttons for the benefit of others.
Never miss any of my latest update Click here to subscribe with your email address.

Thursday, November 15, 2012

HOW TO STOP 'INSTALLING' ON YOUR SYMBIAN PHONES WHEN BOOSTING

Did you formatted your Symbian phone as a result slowness or virus but you did not format your memory card due to the fact that you don’t want to miss the files you saved on it and you notice that every time you switch On your phone it will display ‘Installing’ and take time before the phone come normal. This might annoying you and you might have try to fix it up by remove one or more applications on your memory card but it still doing the same thing. Below are the simple steps for you to figure it out.


 NOTE: Your phone must be hacked Click here  to learn how to hack your symbian phone
Follow These Steps.
1. Have access to your Private folder by applying Open4all patches in Rompatcher Or Opening Capsoff.
2. Then Open your X-Plore.
3. Go to your Memory Card known as E:.
4. Go to Private Folder in your Memory Card.
5. Then open it and look for 10202dce.
6. Delete the folder 10202dce in the private folder.
It is simple as that, keep enjoying your phone.
Never miss any of my latest update Click here to subscribe with your email address.
Sharing is a caring, don't forget to share this post for the benefit of others.

MTN NEW SELFCARE APPLICATION FOR MOBILE DEVICES

This is to notify you as my good reader that MTN has just launched an application for its web self service portal. The application which supports phones and tablets on multiple platforms including Android, IOS (Apple) BlackBerry and J2ME allows you do the following from your mobile device:
  • Check your account profile 
  • Check your recent account recharges 
  • Subscribe to a blackberry/Fastlink/ mobile internet/simple surf data plan 
  • Subscribe to MTN callertunez, music and games on MTN Play 
  • Check available balance and expiry data of your Fastlink/mobile internet/ Simple Surf/BlackBerry data plan 
  • Perform a SIM Swap on your lost/ stolen MTN line 
  • Purchase airtime or pay your phone bills using your Interswitch ATM card 
  • Retrieve your PUK code to unlock your SIM 
  • Request for MTN Data Settings etc.
How to download the MTN Self Care Application
To download the MTN Mobile Self-Care application, simply send an SMS with ‘Care’ to 5018. A link to download the application will be sent as an SMS to your phone, just download the application with link provoded and begin  Enjoy a greater level of convenience and control of your mobile account with the new MTN mobile self-care application.
Visit the MTN official website for more detail. So no more Calling MTN Customer Care... No more going to MTN office. etc

Never miss any of my latest update Click here to subscribe with your email address.
Sharing is a caring, don't forget to share this post for the benefit of others. 

Thursday, November 8, 2012

HOW TO BROWSE WITH YOUR BLACKBERRY SUBSCRIPTION ON YOUR PC VIA USB CABLE ON ALL NETWORKS

Having the Internet on the go is a key component of a BlackBerry; its users value the ability to check e-mail and browse the Web on their handheld. But they may be unaware of its capability to connect to the Internet on a laptop. Using a dial-up connection, a BlackBerry can serve as an external modem when connected to a laptop via USB cable.
You may be wondering how possible is it to use your blackberry smartphone as an internet modem to connect and browse with your laptop? Well this post answer that question. Plus more i will also be telling you how you can use your blackberry subscription to browse on your computer. I will take MTN Nigeria network as a case study.

REQUIREMENTS:
1. Blackberry Desktop Manager (PC Software) [Click here to download]
2. Tether (Blackberry Application) [Click here to download]
3. Make sure you have an Active Blackberry Subscription.
4. Blackberry phone
5. Laptop or Desktop


6. USB Cable 

STEPS NEEDED TO MAKE YOUR BIS WORK ON YOUR COMPUTER
1. Install Blackberry Desktop Manager software to your computer.
2. Install Tether Application to your Blackberry phone ( What this App does is to powers your Blackberry for a stable internet connection with your Desktop Manager).
3. Connect your Blackberry Phone to your PC via the USB Cable, Now Open your Blackberry Desktop Manager, Click on “Internet Mobile” this is located at the bottom left. Now provide your normal service provider’s information e.g  your APN and the rest, Then Save it.
For MTN the APN, Password and Username are as follows
APN : web.gprs.mtnnigeria.net
PASSWORD : web
USERNAME : web
4. Set your Browser e.g Mozilla, Opera, Chrome and Other Software to No Proxy.

Note: Make Sure you Configure the Tether Appication you Installed on your Phone with the Normal MTN Settings.
Now connect and browse till your subscription expires… That is it!

Feel free to share your comments on what you have gained from this post or any further explanation you need. You can do this using the comment box provided below. Also, don't forget to share this post so that more people can benefit from this great post. 
Never miss any of my latest update Click here to subscribe with your email address.

Tuesday, November 6, 2012

CONNECT YOUR LAPTOP TO INTERNET THROUGH WIRELESS VIA MOBILE PHONE (JOIKUSPOT SOFTWARE)

 JoikuSpot is an awesome piece of mobile software which allows you to chain your mobile phone’s 3G capabilities and turn it into a wi-fi hotspot. Bascially, it gives you a dead-simple way to connect your laptop/desktop to internet via mobile phone.
Not only does this mean you’ve got a wi-fi hotspot in your pocket – this also means you have less hardware to lug around if you want to use your laptop and connect to internet through mobile. No more Bluetooth/Cable/USB dongles. Everything’s now 100% wireless.

Joikuspot currently runs on the following symbian platform:
Nokia E51, E52, E55, E60, E61, E61i, E63, E65, E66, E71, E72, E73, E75, E90, N78, N79, N80, N81, N81 8GB, N82, N85, N86, N91, N93, N93i, N95, N95 8GB, N95 Americas, N95 8GB Americas, N96, N97, N97 Mini, 5530 XpressMusic, 5630 XpressMusic, 5730 XpressMusic, 5800 XpressMusic, C5-03, C6, E5, E6, X5, X6, X7, 6710 Navigator, 8800 Erdos, N8, E7, C6-01, C7, 702T, T7, Oro, Nokia 500, Nokia 600, Nokia 603, Nokia 700, Nokia 701, Nokia 808, N900, Satio (Idou) , Vivaz and Vivaz Pro phone models.
As well as a few of Samsung’s higher end phones. Of course, all phones supported share the same criteria which is that the device has to support data transfer (eg. 3G, EDGE, HSDPA, GPRS), and the phone has wi-fi capabilities (needed to broadcast the wi-fi you create).

Joikuspot has a lot of features which includes:
Encryption support: Joikuspot is incredibly secure and supports WEP including 128bit key generator for your security. This ensures that you maintain control over who uses the wifi generated from your phone, and to ensure your session is fully secure.  GPS Compatibility: If you feel generous enough to operate your mobile hotspot without a password and you want to share it with the world, Joikuspot allows you to sync up with your GPS (if your phone has one) and broadcast your location to the world on Google Maps.
Battery threshold: This feature shuts down Joikuspot when the battery level is too low. As you can imagine, intensive 3G AND Wifi usage will drain the battery extremely quickly. You can set it up so that it shuts off at a certain battery level so you never have to worry about empty phone batteries when you need to make a call.
Multiple connections: Joikuspot allows you to share your bandwidth with others or multiple devices at the same time so several people can share a single connection.
Auto reconnect: Works in the background to automatically reconnect every time a data connection is lost. This is crucial for a seamless experience.

Joikuspot comes in two different flavors similar to one of my recent post on How to turn your computer into a wifi hotspot with Connectify Software.
1. Joikuspot Light supports HTTP and HTTPS protocols, which is enough to handle most casual users covering basic browsing, web based email as well as Instant Messaging. It doesn’t however support some of the more enterprise and businesslike features like Outlook and corporate email.
2. Joikuspot Premium however supports ALL protocols allowing users to use Outlook, YouTube, Web radio, FTP, VPNs, Skype and other programs requiring specific protocols that practically covers everything anyone would ever want to do on the web.
The premium edition costs certain amount of dollars, and also has special bulk licensing options for corporate use, but as usual am going to share you the link to download Joiku premium without paying dine.
It’s extremely simple to set up and easy to use.
Get the copy of Joiku Premium with the link below
Joikusoft JoikuSpot Premium v.3.10(977) s60v3&5 Express Signed.sis
Bart

All you need to do is to instant joikuspot on your mobile and restart your phone.
Open the software and click Start.
Select your prefer network, then you can begin search for WLAN with another devices.
NOTE: Before you use this to turn your cell phone as a wireless modem, ensure that you are on an unlimited data plan because the data usage is understandably intense for this application.
Enjoy!!


Feel free to share your comments on what you have gained from this post or any further explanation you need. You can do this using the comment box provided below. Also, don't forget to share this post so that more people can benefit from this great post. 
Never miss any of my latest update Click here to subscribe with your email address.

Sunday, November 4, 2012

HOW TO TURN YOUR COMPUTER INTO A WIFI HOTSPOT (SHARE YOUR INTERNET CONNECTION AND FILES)

Connectify is a software that allows your laptop or wireless can be used as WiFi so it can be used by other laptop and mobile phones that support Wifi. In addition to connection sharing, Connectify is also able to file sharing as well.
Am easily sharing my computer network connection with my symbian and iPhone through wireless connection with connectify software without doing much settings. Connectify does not do that only, it lets share your computer connection with computers around you so.
Connectify also allows you to password your internet connection so unauthorized users won’t have access to your connection. So, whether you need to share your internet connection with your Android device, iPhone, Symbian smartphone, your friends or any wireless enabled device, this software lets you do it even if you know nothing about networking.

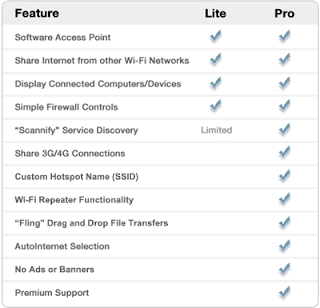
Connectify has two type which is Lite and Pro, See the Features of both in the screenshot below:
As you can see from the above screenshot Connectify Pro has a lot of feature than Connectify Lite, before you can use connectify Pro you need to pay certain amount of dollars, Click here  to testify to it. But here am going to share you the link to download Connectify Pro with license key, which will enable you to use Pro version for life without paying dine.

Download connectify Pro3.5.zip
Bart

Download License key for connectify Pro3.5
Bart
How to use Connectify
- First download Connectify and License key from the link above.
- Install it and restart your computer.
- Start Connectify, use the code inside license key  to upgrade to Pro and do the basic settings you’re going to need
- Hotspot Name: put any name you like
- Password: You must note that the password can only be between 0-9 and A-F.
- Make sure your Wireless is turn on
- Click on Start Hotspot and search for your this network with another phone or any other computer around.
- Simply connect and input the WEP Key you set up earlier and you’re connected.
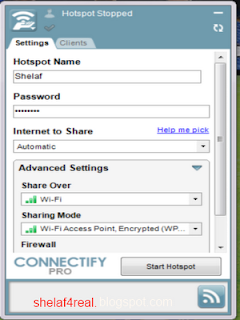
It is as easy as that! Now you are sharing your computer’s internet connection with your mobile phone. If there is any unauthorized person connected to your network, you can easily detect and disconnect them by checking the Clients tab:
That is my Symbian N Series conected. Don’t get me wrong, this is not just for sharing your computer’s network connection with your mobile phone only, you can use it to share your connection with any wireless enabled device without much knowledge in networking. Enjoy!

I love reasonable comments. Feel free to share your comments on what you have gained from this post or any further explanation you need. You can do this using the comment box provided below. Also, feel free to share this post so that more people can have access to the effective information contained in it, through sharing tools available on this blog. They would be glad you gave them this information.  Click here to subscribe for receiving Shelaf latest updates direct to your e-mail address

Thursday, November 1, 2012

HOW TO FREE UP DISK SPACE AND EXTEND PARTITION WITH FREE PARTITION MANAGER FOR LOW DISK PROBLEM

Do you have a Windows PC with system partition that is running out of space? Or do you want to recover some disk space on your C drive? If so, the tips below will help you to free up disk space on your overload hard drive and solve low disk space problem.

How to Free up Disk Space 

Disk Cleanup analyzes your hard drive and looks for unneeded files and folders that are of no further use to your computer. Over time, these files pile up and may need to be cleaned up once in a while. Features such as Temporary Internet Files may take up a lot of valuable disk space that is why your computer needs a 'clean up'.

1. Click Start > All Programs > Accessories > System Tools.
2. Select Disk Cleanup.
3. Select the hard disk drive that you want to clean up in Drive Selection in the dialog box and click OK.
4. Wait until Disk Cleanup calculates how much space that you will be able to be cleaned up. This may take a few minutes to complete, so be patient.
5. Click the Disk Cleanup tab, and then select the check boxes for the files you want to delete. You can view these files before deletion by choosing View Files or View Pages for a file you have highlighted.
6. Click OK and then Delete files to confirm. Disk Cleanup will begin deleting the files.
You may also uninstall some programs or delete some unused files to free up disk space. Generally, after these operations, you can free up disk space and solve the low disk space problem. But after a while, you may find the same problem occurred again. What will you do, cleanup disk again? These Windows utilities cannot solve the problem permanently. The best way to solve this problem is cleaning up the disk and extending the partition by partition manager software.

How to Extend Partition with Free Partition Manager

Step-by-step instruction to extend system partition (C: drive)
Tips: For your data safety, we strongly recommend you backup data with free backup software - EaseUS Todo Backup Free before resizing partitions.
Step 1. Launch EaseUS Partition Master. If there is unallocated space behind the system partition, please directly go to step 4. If there is no unallocated space behind the system partition, please follow the below steps.
Step 2. Select partition E:, right click it, select "Resize/Move partition" and drag the partition handle leftwards to shrink E drive. Then there will be unallocated space behind E: drive.
Resize the data partition
Step 3. Let the unallocated space be behind the system partition C by moving E: drive rightwards and click OK.
Move the data partition
Step 4. Select the system partition (C: drive), also right click it and select "Resize/Move partition", extend partition by dragging the partition handle rightwards.
Extend system partition
Step 5. You will see your operation below the "Pending Operation", to finish it please click Apply.
For more detailed information, please visit resizing and moving partitions.
Besides Partition Manager, EaseUS Partition Master provides Partition Recovery Wizard and Disk and Partition Copy Wizard features. It is a complete solution to solve your disk and partition problem.

Thanks to the owner of www.partition-tool.com for flashing more light on this tutorial.


If you enjoyed this post and wish to be informed whenever a new post is published, then make sure you Subscribe to our regular Email Updates
Don't for get to Click on any of Share buttons to inform your other friends